
다음의 구조를 가지고 있다.
├─assets
│  ├─css
│  ├─icomoon
│  │  ├─demo-files
│  │  └─fonts
│  ├─img
│  │  ├─docs
│  │  └─projects
│  └─js
├─_data
├─_draft
├─_featured_categories
├─_featured_tags
├─_includes
│  ├─scripts
│  └─styles
├─_js
│  ├─lib
│  └─src
│      └─flip
├─_layouts
├─_plugins
├─_posts
└─_sass
    ├─hydejack
    └─pooleparty
참고로 Windows에서 Tree 구조를 알고싶은 폴더로 가서 다음과 같이 해주면 된다.,
tree -f
다음 사이트 를 참조한다.
Jekyll 자체의 디렉토리 구조와 그 특성은 다음 사이트를 참조한다.
Jekyll의 Directory 구조
---
layout: page
title: About
sidebar_link: true
---
특히 여기서, 만일 Page가 Side bar에 나타나기를 원한다면 sidebar_link: true 이렇게 붙여주면 Side Bar에 나타난다.
Git의 경우 워낙에나 잘 나와 있는 문서들이 있으나 여기서는 실제 Git을 설치하면서 알게 된 사항들에 대하여 논한다.
세부 사항들은 대부분 Sub 항목으로 정리하였다.
의외로 간단하다.
Google Analytics 의 적용방식을 참고하여 만들면 된다.
<!-- google_ad_client: "ca-pub-2352406350095521" -->

{% if jekyll.environment == 'production' and google_ad_client %}
<!-- google Adsence -->
<script async src="//pagead2.googlesyndication.com/pagead/js/adsbygoogle.js"></script>
<script> (adsbygoogle = window.adsbygoogle || []).push({
google_ad_client: "{{ site.google_ad_client }}",
enable_page_level_ads: true
});
</script>
{% endif %}
google_ad_client: ca-pub-2352406350095521
<title>
{% if page.title == "Home" %}
{{ site.title }}{% if site.tagline %} · {{ site.tagline }}{% endif %}
{% else %}
{{ page.title }} · {{ site.title }}
{% endif %}
</title>
{% include google-analytics.html %}
<title>
{% if page.title == "Home" %}
{{ site.title }}{% if site.tagline %} · {{ site.tagline }}{% endif %}
{% else %}
{{ page.title }} · {{ site.title }}
{% endif %}
</title>
{% include google_adsense.html %}
{% include google-analytics.html %}
post.html 파일에 Debug Code를 넣고 테스트 해보면 된다.
Jekyll 애드센스 승인받기
Google Analytics & AdSense for Jekyll Blogs
<div id="sidebar">
  <header>
    <{% if page.layout == "index" %}h1{% else %}div{% endif %} class="site-title">
      <a href="{{ site.baseurl }}/">
        {% unless page.url == "/" %}
          <span class="back-arrow icon">{% include svg/back-arrow.svg %}</span>
        {% endunless %}
        {{ site.title }}
      </a>
    </{% if page.layout == "index" %}h1{% else %}div{% endif %}>
    <p class="lead">{{ site.description }}</p>
  </header>
  {% include sidebar-nav-links.html %}

  {% if site.version %}
    <span class="site-version">Currently v{{ site.version }}</span>
  {% endif %}

  {% include sidebar-icon-links.html %}
  {% include copyright.html %}
</div>
{{ xxx }} 로 나타나는 부분이 Hydeout의 변수 부분이다.
각각의 변수는 다음의 의미이다. (그림 참조)
_sass\hydeout\_variables.scss 에서,
// Hyde theming
$sidebar-bg-color: #202020 !default;
$sidebar-title-color: #ffffff !default;
$sidebar-sticky: true !default;
$layout-reverse: false !default;
$sidebar-bg-color 항목을 이렇게 바꾼다.
// Hyde theming
//$sidebar-bg-color: #202020 !default;
$sidebar-bg-color: #106792 !default;
$sidebar-title-color: #ffffff !default;
$sidebar-sticky: true !default;
$layout-reverse: false !default;
Jekyll blog를 만들면서 알게된 사항들을 기록하는 페이지다. 많은 경우 바로, Site를 참조하는 경우가 된다.
https://mmistakes.github.io/minimal-mistakes/docs/layouts/
Jekyll의 Directory 구조
Ruby와 Jekyll 설치
Jekyll 기본 사항
Hydeout Theme 꾸미기
Multiple Category, Page
플러그인을 사용한 Jerkyll Sitemap 만들기
플러그인 없이 Jekyll Sitemap 만들기
내 홈페이지를 Google Console에 등록하기
Jekyll에 MathJax Embedding 시키기
Multiple and Hierarchical Category
Front matter?
_config.yml 변수 추가시의 문제점
Google Adsense 적용
다음 페이지에 있는 내용을 textile로 변환하였다.
Github Page에 Jekyll 기반의 블로그를 만들면서 적용한 내용을 기록하려고 합니다.
https://jekyllrb-ko.github.io/ 페이지를 방문하면 지킬을 설치해서 빠른 시작을 할 수 있습니다. 여러모로 손이 많이 가기 때문에 이미 만들어져 있는 테마를 활용하기로 합니다.
http://jekyllthemes.org/ 에 방문해서 지킬 테마를 찾습니다.
MIT, Creative Commons, GPL가 많이 보이고 대다수가 MIT 라이선스 입니다.
Github Page를 이용하면 소스를 자연스럽게 공개하게 되지만, 복잡하게 생각하지 않으려고 MIT 라이선스가 적용된 테마를 선택했습니다. 해당 테마의 github 저장소를 Fork 한 뒤 가져온 저장소 이름을 {github_id}.github.io로 변경하면 생성이 완료됩니다.
Github Page를 생성하는 것 만으로는 검색엔진에 노출되기 어렵습니다. 다음 과정을 통해서 외부 노출설정을 합니다.
User-agent: *
Allow: /
Disallow: /about.html
Sitemap: http://{github_id}.github.io/sitemap.xml
plugins:
  - jekyll-feed
  - jekyll-sitemap
Jekyll은 ruby기반의 정적 웹사이트이므로 댓글을 넣기위해서 Disqus를 사용합니다.
우선 Disqus 방문해서 가입합니다.
우상단의 설정을 누른 뒤 (톱니바퀴) Admin > Start > Installing Disqus > Create a Site 메뉴를 순서대로 클릭해서 블로그를 등록합니다.
상당수의 지킬 테마에서 Disqus를 지원하고 있지만, 현재 사용중인 테마에 관련 코드가 없다면 https://disqus.com/admin/universalcode/를 참고합니다.
테마에서 Disqus를 지원하고 있다면 _config.yml 파일에 정보를 기입합니다. 변수명은 해당 코드가 들어가는 페이지를 참고해서 일치 시킵니다.
{ site.disqus.shortname }를 설정파일에서 정의하면
disqus:
    shortname: { disqus_id }
_config.yml¶최종적으로 루트의 _config.yml 파일에 정의되어 있는 블로그 정보를 수정합니다.
/_posts 폴더 아래에 yyyy-mm-dd-title.md 형식의 포스트를 작성합니다. 하위 폴더를 만들어서 계층적으로 작성도 가능합니다. 파일 최상단에 포스트 Meta 정보(YAML Front Matter 입력합니다.
---
  layout: post
  title: { 제목 }
  categories:
    - { 카테고리 }
  tags:
    - { 태그 }
  last_modified_at: 2017-01-01T10:30+09:00
  comments: true
---
변경된 사항을 origin/master로 push하면 자동으로 github page에 업데이트 됩니다. 뿐만 아니라 _config.yml에 플러그인을 추가, 변경을 적용하면 자동으로 빌드까지 이루어지는 것으로 보입니다.
_layouts\post.html 에 다음의 MathJax Rendering 코드를 첨가한다.
- 원본 post.html
---
layout: default
---

<header>
  <h1 class="post-title">{{ page.title }}</h1>
</header>
<div class="content">
  {% include post-meta.html post=page %}

  <div class="post-body">
    {{ content }}
    {% include post-tags.html post=page %}
  </div>

  {% include comments.html %}
  {% include related_posts.html %}
</div>
- 다음의 MathJax Code 를...
<script type="text/x-mathjax-config">
   MathJax.Hub.Config({tex2jax: {inlineMath: [['$','$'], ['\\(','\\)']]}});
</script>
<script type="text/javascript" async
  src="https://cdn.mathjax.org/mathjax/latest/MathJax.js?config=TeX-MML-AM_CHTML">
</script>
- 이렇게 삽입해야 한다.
---
layout: default
---

<header>
  <h1 class="post-title">{{ page.title }}</h1>
</header>
<script type="text/x-mathjax-config">
   MathJax.Hub.Config({tex2jax: {inlineMath: [['$','$'], ['\\(','\\)']]}});
</script>
<script type="text/javascript" async
  src="https://cdn.mathjax.org/mathjax/latest/MathJax.js?config=TeX-MML-AM_CHTML">
</script>
<div class="content">
  {% include post-meta.html post=page %}

  <div class="post-body">
    {{ content }}
    {% include post-tags.html post=page %}
  </div>

  {% include comments.html %}
  {% include related_posts.html %}
</div>
다음과 같이 해도 된다. _config.yml의 Markdown Processing Setting에서
kramdown:
  auto_ids:      true
  entity_output: as_char
  toc_levels:    1..6
  smart_quotes:  lsquo,rsquo,ldquo,rdquo
  input:         GFM
  hard_wrap:     false
  footnote_nr:   1
  show_warnings: false
  math_engine:       mathjax
  math_engine_opts:
    preview:         true
    preview_as_code: true
될줄 알앗는데 안된다. 위에 있는대로 일단 해야 한다.
나중에 KaTeX Embedding을 테스트 해본다.
Jekyll의 공식 Directory 구조 사이트를 참조한다.
The only thing I customized is the CSS in src/common/default.css.
<img src="https://latex.codecogs.com/png.latex?\dpi{99}{urlmathcode}" srcset="https://latex.codecogs.com/png.latex?\dpi{99}{urlmathcode} 1x, https://latex.codecogs.com/png.latex?\dpi{198}{urlmathcode} 2x, https://latex.codecogs.com/png.latex?\dpi{297}{urlmathcode} 3x" alt="{mathcode}">
<img src="https://latex.codecogs.com/png.latex?\dpi{198}{urlmathcode}" alt="{mathcode}" style="zoom: 50%">
기본적으로는 Wordpress 등에서 제공하는 다음과 같은 계층적 Category를 구현하기 위해서이다.
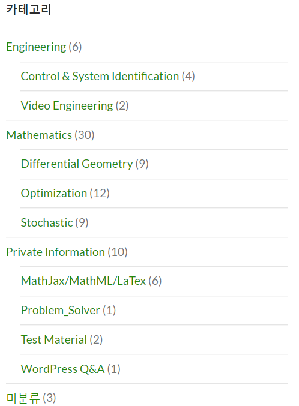
인터넷에 살펴보면 여러가지 방법론들이 나오는데, 여기에서는 오직, Category 만으로 이러한 계층적 Category를 만들고 Sidebar 에 구현하고 이를 이용할 수 있도록 해 보고자 한다.
여기서는 Hydeout Theme를 기본으로 구현 하였다.
그러므로 Hydeout Theme에서 사용된 기법을 다른 Theme에 적용시키는 것은 거의 문제가 없을 것으로 본다.
Category를 다음과 같은 기본 구조로 만들고 싶다.
------ 상위 Category (1)
 |  |---- 하위 Category (1)
 |  |---- 하위 Category (2)
 |---- 상위 Category (2)
    |---- 하위 Category (3)
기본적으로 Fron matter를 어떻게 설계 하느냐가 중요하다.
다음과 같이 Category의 Front matter를 놓는다.
---
layout: category
title: Briefs
menu: true
submenu: true
order: 2
---
중요한 부분은 menu와 submenu의 존재이다. 이것을 사용하여 html 에서 상위 Category인지 하위 Category인지를 파악하고자 한다.
하위 category의 Front matter는 다음과 같이 놓는다.
예를 들어 "Brief" category 에 속하는 "Machine Learning" Category를 다음과 같아야 한다.
---
layout: category
title: Machine Learning
category: Briefs
menu: false
order: 2
---
마지막으로 post는 다음과 같이 쓰면 된다.
---
layout: post
title:  "Deep Image Compression via End to End Learning"
date:   2018-07-07 22:03:00 +0900
categories: [Briefs, Machine Learning]
tags:
  - Machine-Learning
subtitle:   "Machine Learning"
comments: true
---
Hydeout 기본 테마에서는 가장 높은 단계의 Category 혹은 Category 폴더의 Category가 모두 나타난다.
Post 에서는 만일 [category_1, Category_2] 라고 Post의 Front matter에 적었다면, 모든 상위, 하위 Category에서 두 Category중 하나라도 속하는 post가 모두 표시된다.
우리가 원하는 것은 상위 Category에 속하는 post가 표시되고 하위 Category에 표시되는 것은 상위 Category에 표시되는 것 중 하위 Category에 속하는 post만 표시 되었으면 한다.
이러한 기능이 구현 되려면, HTML 에서는 Side bar에 계층적 Category가 나타나도록 하는 것과, Post에서 계층적 Category에서의 Post가 정확히 표시 되도록 하는 2가지 기능이 제공되어야 한다.
sidebar를 표시하는 HTML은 다음과 같다. (sidebar.html in _includes 폴더)
<div id="sidebar">
  <header>
    <{% if page.layout == "index" %}h1{% else %}div{% endif %} class="site-title">
      <a href="{{ site.baseurl }}/">
        {% unless page.url == "/" %}
          <span class="back-arrow icon">{% include svg/back-arrow.svg %}</span>
        {% endunless %}
        {{ site.title }}
      </a>
    </{% if page.layout == "index" %}h1{% else %}div{% endif %}>
    <p class="lead">{{ site.description }}</p>
  </header>
  {% include sidebar-nav-links.html %}

  {% if site.version %}
    <span class="site-version">Currently v{{ site.version }}</span>
  {% endif %}

  {% include sidebar-icon-links.html %}
  {% include copyright.html %}
</div>
여기에서 *sidebar-nav-links.html*를 수정하여 계층적 카테고리가 표시될 수 있도록 한다.
Hydeout 테마에서 원래의 sidebar-nav-links.html 은 다음과 같다.
<nav id="sidebar-nav-links">
  {% if site.sidebar_home_link %}
    <a class="home-link {% if page.url == '/' %} active{% endif %}"
        href="{{ site.baseurl }}/">Home</a>
  {% endif %}
  {% if site.sidebar_blog_link %}
    <a class="page-link {% if page.url == site.sidebar_blog_link %} active{% endif %}"
    href="{{ site.baseurl }}{{ site.sidebar_blog_link }}">Blog</a>
  {% endif %}

  {% comment %}
    The code below dynamically generates a sidebar nav of pages with
    `sidebar_link: true` in the front-matter. See readme for usage.
  {% endcomment %}

  {% include page-links.html %}
  {% include category-links.html %}

  {% include custom-nav-links.html %}
</nav>
여기를 살펴보면 category-links.html 를 통해 Category가 표시됨을 알 수 있다.
다시, category-links.html 를 살펴보면
{% comment %}
  Dynamically generate list of links to all category pages
{% endcomment %}
{% assign pages_list = site.pages|sort:"sidebar_sort_order" %}
{% for node in pages_list %}
  {% if node.title != null %}
    {% if node.layout == "category" %}
      <a class="category-link {% if page.url == node.url %} active{% endif %}"
          href="{{ site.baseurl }}{{ node.url }}">{{ node.title }}</a>
    {% endif %}
  {% endif %}
{% endfor %}
site 내의 page의 내용을 읽고 ({% assign pages_list = site.pages|sort:"sidebar_sort_order" %}) 이중에서 category에 해당하는 layout 정보에서 url을 가진 Category 제목을 side bar에 표시하는 것이다.
그러므로, 계층적 category가 표시될 수 없다.
이것을 다음과 같이 수정하여 계층적으로 표시한다.
{% comment %}
  Dynamically generate list of links to all category pages
{% endcomment %}

{% assign pages_list = site.pages| where: "menu", true |sort:"sidebar_sort_order" %}
{% assign subpages   = site.pages| where: "menu", false|sort:"sidebar_sort_order" %}

{% assign count = 0%}
{% for node in pages_list %}
  {% if node.title != null %}
    {% if node.layout == "category" %}
    {% assign count = count | plus: 1 %}
      <div  class="list-wrapper">
      <a class="category-link {% if page.url == node.url %} active{% endif %}"
          href="{{ site.baseurl }}{{ node.url }}">{{ node.title }}</a>
        {% if node.submenu %}<label class="folder" for="list-item-{{ count }}">▾</label>{% endif %}
      </div>
      <ul class="list-body">
        {% for subnode in subpages %}
            {% if subnode.layout == "category" %}
                {% if subnode.category == node.title %}
                    <li>
                    <a class="sidebar-nav-subitem{% if page.url == subnode.url %} active{% endif %}" href="{{ subnode.url | relative_url }}">{{ subnode.title }}</a>
                    </li>
                {% endif %}
            {% endif %}
        {% endfor %}
      </ul>
    {% endif %}
  {% endif %}
{% endfor %}
먼저, subpages 변수를 선언하고, menu 변수가 false일때 해당 페이지로 할당한다. 앞에서 menu 변수값이 true이면 상위 category, false이면 하위 category로 두었으므로, menu 변수값이 false인 페이지는 하위 category 페이지이다.
그러므로 for문을 통해 page에서의 상위 category의 제목을 표시하고 하위 category를 검색하여 제목과 url을 표시하도록 수정하면 된다.
위에서는 sidebar에서 하위 category가 표시되는 반면에 하위 category를 클릭하면 해당 하위 category 페이지가 열리면서, 해당 category에 해당하는 post가 표시되는 것에 대하여 알아보자.
해당 되는 page 는 category.html (in _layouts 폴더)이다.
---
layout: page
---

{% unless page.content == '' %}
  {{ content }}
{% endunless %}

<ul class="posts-list">
  {% assign category = page.category | default: page.title %}
  {% for post in site.categories[category] %}
    <li>
      <h3>
        <a href="{{ site.baseurl }}{{ post.url }}">
          {{ post.title }}
          <small>{{ post.date | date_to_string }}</small>
        </a>
      </h3>
    </li>
  {% endfor %}
</ul>
여기에서 보면 상위 category에 대한 post 만 표시되도록 되어 있다.
이것을 submenu 변수를 사용하여 상위 category이면 해당 되는 post가 모두 표시되도록 하고 하위 category 이면, 하위 category에 해당하는 post의 title이 표시되도록 하였다.
원본 코드와 비교해 보면 구현 방법을 쉽게 알 수 있으리라 생각한다.
수정된 코드는 다음과 같다.
---
layout: page
---

{% unless page.content == '' %}
  {{ content }}
{% endunless %}

<ul class="posts-list">
    {% assign category = page.category | default: page.title %}
    {% if page.submenu %}
        {% for post in site.categories[category] %}
            <li>
                <h3>
                    <a href="{{ site.baseurl }}{{ post.url }}">
                    {{ post.title }}
                    <small>{{ post.date | date_to_string }}</small>
                    </a>
                </h3>
            </li>
        {% endfor %}
    {% else %}
        {% assign subcategories = page.title %}
        {% for post in site.categories[subcategories] %}
            <li>
                <h3>
                    <a href="{{ site.baseurl }}{{ post.url }}">
                    {{ post.title }}
                    <small>{{ post.date | date_to_string }}</small>
                    </a>
                </h3>
            </li>
        {% endfor %}
    {% endif %}

</ul>
다음 사이트들을 체크한다.
본격적으로 Jekyll Theme 커스터마이징하기
지킬에 카테고리와 태그 적용하기
Jekyll Pagination 젬을 통해 무한 스크롤 만들기
이사람의 방법도 좋다.
https://isme2n.github.io/devlog/2017/03/09/Blog-Jekyll-theme/
목표는 Sidebar에 나타나는 것을 분석하는 것이므로 다음의 code를 분석하자.
div id="_yDrawer">
  <div id="_sidebar" class="sidebar">
    <div class="sidebar-bg" style="background-color:{{ color }};background-image:url({{ image }})"></div>
    <header class="sidebar-sticky" role="banner">
      <br/>
      <div class="sidebar-about">
        <h1><a id="_title" href="{{ '/' | relative_url }}">{{ site.title }}</a></h1>
        {{ site.tagline | truncatewords:50 | markdownify }}
      </div>

      <br/>
      <br/>
      <nav class="sidebar-nav heading" role="navigation">
        {% include nav.html %}
      </nav>
    <br/>
    <br/>
      <div class="sidebar-box">
        {% if author.picture %}
          {% include srcset-img.html class="me" img=author.picture alt=author.name %}
        {% endif %}
      </div>
      {{ site.description | truncatewords:50 | markdownify }}
      {% assign author = site.data.authors.first[1] %}
      {% if author.social %}
        <div class="sidebar-social">
          {% include social.html social=author.social %}
        </div>
      {% endif %}
    </header>
  </div>
</div>
<div class="sidebar-bg" style="background-color:{{ color }};background-image:url({{ image }})"></div>
여기서 각 변수가 어디에 있는지 살펴보면
c:\BitNami\redmine-2.4.2-0\apps\redmine\htdocs\plugins\
만일 “redmine_code_review” 라는 plugin 이 있다면 해당 폴더를 plugins 에 복사한다.
C:\BitNami\redmine-2.4.2-0\apps\redmine\htdocs
ruby bin\rake redmine:plugins:migrate RAILS_ENV=production
Linux 와는 다르게 ruby 는 전체 Redmine 폴더에서 수행 가능하나, rake의 경우는 전체에서 수행가능한 버전은 0.9.2 이며 plugin 설치를 위한 10.0.1 은
C:\BitNami\redmine-2.4.2-0\apps\redmine\htdocs\bin
밑에 있으므로 이렇게 수행시켜야 한다.
Bitnami Redmine stack 사용 cmd를 수행시키고 마찬가지로 다음 폴더로 이동한다.
C:\BitNami\redmine-2.4.2-0\apps\redmine\htdocs
여기에서 다음 명령을 수행한다. (plug-in 이름이 redmine_code_review 일 경우)
ruby bin\rake redmine:plugins:migrate NAME=redmine_code_review VERSION=0 RAILS_ENV=production
ruby bin\rake redmine:plugins:migrate NAME=redmine_ckeditor-master VERSION=0 RAILS_ENV=production
ruby bin\rake redmine:plugins:migrate RAILS_ENV=production
그동안 Ruby bundle이 제대로 안되었던 이유는 순전히 경로 문제였음
Bundle, ruby, rake 의 경로만 잘 잡아 주면 ruby 관련 어떤 것도 정확하게 하 ㄹ수 있음 현재는 bundle.bat에 있는 ruby.exe의 경로를 절대 경로로 잡아 준 상태임
기본적으로 이렇게 해주면 된다
C:\Bitnami\redmine-2.6.5-0\apps\redmine\htdocs>c:\Bitnami\redmine-2.6.5-0\ruby\bin\bundle exec c:\Bitnami\redmine-2.6.5-0\ruby\bin\rake redmine:plugins:migrate RAILS_ENV=production
C:\Bitnami\redmine-2.6.0-2\ruby\bin\bundle exec rake db:migrate RAILS_ENV=production
아파치 서버의 Error log를 자세히 살펴보면 문제가 되는 부분을 알 수 있다
C:\Bitnami\redmine-2.6.5-0\apps\redmine\htdocs\plugins\redmine_gc_sync
Redmine 폴더의 Bitnami Redmine stack Command 창을 사용하면, 해당 환경은 Redmine의 Ruby 개발환경이 그대로 포팅 되어 있어 위에서와 같이 Path를 생각하지 않아도 정상적으로 잘 작동한다.
다음을 수정하여 MathJax, mermaid를 설치할 수 있다.
c:\Bitnami\redmine-2.6.5-0\apps\redmine\htdocs\app\views\layouts\base.html.erb
PlugIn 설치 기본
Plugin의 설치와 ruby 사용
Thin_redmine 서버가 정상동작하지 않을 때
Redmine 에서 MathJax를 사용하여 수식을 편집하는 방법
Redmine 에서 Mermaid 이용하는 방법
주의 : 반드시 Redmine Server를 끄고 다음 내용들을 업데이트 한다.
이 사이트를 참조한다
redmine에서 간단히 Mermaid를 사용하는 방법을 알아본다. 결론은 mermaid.js를 참조할 수 있게 하면 되는 것이다.
The first step is to include mermaid javascript and css files, I just added those three lines to @/usr/share/redmine/app/views/layouts/base.html.erb@ file somewhere between @<head> </head>@ tags
그런데 Windows의 Bitnami redmine stack에서는 Apache 서버 밑에 해당 폴더가 존재한다.
Linux의 경우는 Default로 Apcache 서버가 설치되어 있어 이러한 구조를 가지지 않는다.
(Linux의 Apache서버에서 해당 Directory를 연결/등록만 시켜주면 된다)
/C/Bitnami/redmine-2.6.5-0/apps/redmine/htdocs/app/views/layouts
여기서 <head> </head> tags 사이에 다음코드를 삽입한다.
<link rel="stylesheet" href="http://knsv.github.io/mermaid/css/mermaid.css">
<script type="text/javascript" src="https://cdn.rawgit.com/knsv/mermaid/0.5.8/dist/mermaid.js"></script>
<script>mermaid.initialize({startOnLoad:true});</script>
/usr/share/redmine/lib/redmine/wiki_formatting/macros.rb 에 다음의 Macro를 삽입하여 Wiki editor에서 사용하도록 한다,
desc "Add mermaid graphs to your wiki. Example:\n\n {{mermaid\ngraph TD;\n A-->B;\nA-->C;\nB-->D;\nC-->D;\n}}"
macro :mermaid do |obj, args, text|
  out = ''.html_safe
  out << content_tag('div', text, :class => 'mermaid')
  out
end
다음을 테스트 해보자.
{{mermaid
graph TD;
   A-->B;
   A-->C;
   B-->D;
   C-->D;
}}
{{mermaid
graph TD;
A-->B;
A-->C;
B-->D;
C-->D;
}}
안타깝게도 이 모든 방법들이 실패했다. 위 방법대로 하면 일단, mermaid가 작동하지만, Apache 서버가 불안정해지면서 Server가 제대로 Off 되지 못한다.
Redmine 2.6.x 대에서 왜 그러한지 파악하지 못했다.
따라서, 현재로서는 Remine을 3.4.x 대로 업그레이드 한 후, Mermaid를 설치해야 할 듯하다.
https://jekyllrb-ko.github.io/docs/windows/
- Ruby 를 받고 적당한 곳에 풀어놓은 다음 설치를 시작한다. 3가지 방법중 1번 (Msys only) 혹은 3번 (Msys and MingW)을 선택한다.
- MingW의 경우 적절하게 설치도힌 이전 버전이 있다면, MingW는 이를 업데이트 하는 방식으로 설치된다.
- Jekyll의 설치도 위의 경우와 마찬가지이다.
- Jekyll -v 를 수행하여 정상적인 설치가 되었는지 알아본다.
- 많은 경우, Ruby bundle 의 버전 문제등에 의하여 에러가 발생한다.
- 해당 에러는 구글링을 통해 해결한다.
Jekyll serve를 수행하여 Jekyll Site를 localhost:4000 에서 수행시킨다.SSH Tunneling
Windows Reminal에서 한글이 깨져 보일때
SSH Tunneling 그런데 죽은 링크이다.
http://wiki.dgoon.net/doku.php?id=misc:sshtunneling
이런 상황에서, 나는 LinuxMachine에 ssh로 접속해서 내 WindowDesktop에 핑을 날려 살아있다는 것을 확인할 수 있다. 패킷을 보낼 수 있는 것이다. 공유기에서 연결하진 않았지만, 외부에서 WindowDesktop에 원격접속을 하고 싶다. 원격 접속 포트는 3389 번.
ssh -oport=2222 -L 1010:WindowDesktopIP:3389 LinuxMachineIP
이것을 Putty 로 하려면
Putty 의 접속->SSH->터널링
여기에서 원포트를 1010 으로 하고 원격으로 쓰고 싶은 컴퓨터의 ip:3389 로 “대상” 에 적는다.
즉, 129.254.112.185:3389
그리고 추가를 눌러주면
L1010 129.254.112.185:3389 가 된다.
그 다음에 세션에서 Host Name 에 129.254.112.185 port 22 즉, SSH 접속을 체크하고 이를 저장한다.,
그리고 접속을 하면 SSH 접속이 된다. (SSH 서버 즉, SvcCOPSSH 의 사용자를 현재 jinwuk 으로 설정해 놓아야 한다. 즉 내컴퓨터의 사용자)
그렇게 하면 SSH telnet 접속이 된다. 윈도우 Telnet 서버는 꺼도 된다.
그 다음 원격데스크 탑에서
Localhost:1010 을 하면 포트포워딩이 되면서 원격데스크탑이 열린다.
jinwuk@JINWUK-PC-185 timestamp: 1396971867
Redmine에 Google Calender Plug-In을 설치하다가 SSL Certification 문제로 Ruby의 bundle install에서 Error가 발생하였다.
다음과 같다.
C:\Bitnami\redmine-2.6.5-0\apps\redmine\htdocs>bundle install
Fetching source index from https://rubygems.org/
Retrying source fetch due to error (2/3): Bundler::Fetcher::CertificateFailureEr
ror Could not verify the SSL certificate for https://rubygems.org/.
There is a chance you are experiencing a man-in-the-middle attack, but most like
ly your system doesn't have the CA certificates needed for verification. For inf
ormation about OpenSSL certificates, see bit.ly/ruby-ssl. To connect without usi
ng SSL, edit your Gemfile sources and change 'https' to 'http'.
Retrying source fetch due to error (3/3): Bundler::Fetcher::CertificateFailureEr
ror Could not verify the SSL certificate for https://rubygems.org/.
There is a chance you are experiencing a man-in-the-middle attack, but most like
ly your system doesn't have the CA certificates needed for verification. For inf
ormation about OpenSSL certificates, see bit.ly/ruby-ssl. To connect without usi
ng SSL, edit your Gemfile sources and change 'https' to 'http'.
Could not verify the SSL certificate for https://rubygems.org/.
There is a chance you are experiencing a man-in-the-middle attack, but most
likely your system doesn't have the CA certificates needed for verification. For

information about OpenSSL certificates, see bit.ly/ruby-ssl. To connect without
using SSL, edit your Gemfile sources and change 'https' to 'http'.
Redmine의 버전이 너무 오래되어 Ruby 관련 및 Git, SSL등이 업그레이드 되었는데 해당되는 SSL 정책들이 바뀌었음에도 이를 제대로 반영하지 못했기 때문이다.
해결방법은 올바른 pem 파일을 잘 등록 시켜주고 이것으로 SSL Certification이 이루어지도록 하면 된다.
https://gist.github.com/fnichol/867550
에서 cacert.pem 파일을 받는다.
cacert.pem 파일은 SSL 관련 업데이트가 크게 이루어질 때 마다, 변화하기 때문에 가급적 최신 pem 파일을 받아야 한다.
다음과 같이 환경변수를 잡고
C:\Bitnami\redmine-2.6.5-0\apps\redmine\htdocs>SET SSL_CERT_FILE=c:\Users\root\c
acert.pem
테스트 해본다.
C:\Bitnami\redmine-2.6.5-0\apps\redmine\htdocs>gem sources
*** CURRENT SOURCES ***

https://rubygems.org/

C:\Bitnami\redmine-2.6.5-0\apps\redmine\htdocs>gem install bundler
Fetching: bundler-1.16.2.gem (100%)
Successfully installed bundler-1.16.2
Parsing documentation for bundler-1.16.2
Installing ri documentation for bundler-1.16.2
1 gem installed
이렇다고 해서 thin_redmine이 Stop 되는 것이 고쳐지는 것은 아니다. 단지 bundler가 Update된 것일 뿐이다.
실제로 bundle install을 수행하자.
다음과 같이 정상적으로 install 됨을 확인할 수 있다.
C:\Bitnami\redmine-2.6.5-0\apps\redmine\htdocs>bundle install
The dependency activerecord-jdbc-adapter (~> 1.3.2) will be unused by any of the
 platforms Bundler is installing for. Bundler is installing for ruby, x86-mingw3
2 but the dependency is only for java. To add those platforms to the bundle, run
 `bundle lock --add-platform java`.
The dependency activerecord-jdbcmysql-adapter (>= 0) will be unused by any of th
e platforms Bundler is installing for. Bundler is installing for ruby, x86-mingw
32 but the dependency is only for java. To add those platforms to the bundle, ru
n `bundle lock --add-platform java`.
Fetching gem metadata from https://rubygems.org/..........
Fetching gem metadata from https://rubygems.org/.
Resolving dependencies.......
RubyGems 2.0.14 is not threadsafe, so your gems will be installed one at a time.
 Upgrade to RubyGems 2.1.0 or higher to enable parallel gem installation.
Using rake 10.4.2
Fetching insensitive_hash 0.3.3
Installing insensitive_hash 0.3.3
Installing tzinfo 0.3.44
Fetching TimezoneParser 0.2.0
Installing TimezoneParser 0.2.0
Installing i18n 0.6.11
Installing multi_json 1.11.0
Installing activesupport 3.2.21
Installing builder 3.0.4
Installing activemodel 3.2.21
Installing erubis 2.7.0
Installing journey 1.0.4
Installing rack 1.4.5
Installing rack-cache 1.2
Installing rack-test 0.6.3
Installing hike 1.2.3
Installing tilt 1.4.1
Installing sprockets 2.2.3
Installing actionpack 3.2.21
Installing mime-types 1.25.1
Installing polyglot 0.3.5
Installing treetop 1.4.15
Installing mail 2.5.4
Installing actionmailer 3.2.21
Installing arel 3.0.3
Installing activerecord 3.2.21
Installing activeresource 3.2.21
Fetching public_suffix 2.0.5
Installing public_suffix 2.0.5
Fetching addressable 2.5.2
Installing addressable 2.5.2
Using bundler 1.16.2
Installing coderay 1.1.0
Installing daemons 1.1.9
Installing eventmachine 1.0.3 (x86-mingw32)
Fetching multipart-post 2.0.0
Installing multipart-post 2.0.0
Fetching faraday 0.15.2
Installing faraday 0.15.2
Installing json 1.8.2 (x86-mingw32)
Fetching jwt 1.5.6
Installing jwt 1.5.6
Fetching signet 0.8.1
Installing signet 0.8.1
Fetching google_calendar 0.5.2
Installing google_calendar 0.5.2
Installing rack-ssl 1.3.4
Installing rdoc 3.12.2
Installing thor 0.19.1
Installing railties 3.2.21
Installing jquery-rails 3.1.2
Installing mysql2 0.3.18 (x86-mingw32)
Installing net-ldap 0.3.1
Installing ruby-openid 2.3.0
Installing rack-openid 1.4.2
Installing rails 3.2.21
Installing rbpdf 1.18.5
Installing redcarpet 2.3.0 (x86-mingw32)
Installing request_store 1.0.5
Installing rmagick 2.13.4 (x86-mingw32)
Installing thin 1.6.1 (x86-mingw32)
Updating files in vendor/cache
  * insensitive_hash-0.3.3.gem
  * TimezoneParser-0.2.0.gem
  * public_suffix-2.0.5.gem
  * addressable-2.5.2.gem
  * multipart-post-2.0.0.gem
  * faraday-0.15.2.gem
  * jwt-1.5.6.gem
  * signet-0.8.1.gem
  * google_calendar-0.5.2.gem
Bundle complete! 28 Gemfile dependencies, 53 gems now installed.
Gems in the groups development, test and sqlite were not installed.
Use `bundle info [gemname]` to see where a bundled gem is installed.
Post-install message from rdoc:
Depending on your version of ruby, you may need to install ruby rdoc/ri data:

<= 1.8.6 : unsupported
 = 1.8.7 : gem install rdoc-data; rdoc-data --install
 = 1.9.1 : gem install rdoc-data; rdoc-data --install
>= 1.9.2 : nothing to do! Yay!
Post-install message from mysql2:

================================================================================
======================

  You've installed the binary version of mysql2.
  It was built using MySQL Connector/C version 6.1.5.
  It's recommended to use the exact same version to avoid potential issues.

  At the time of building this gem, the necessary DLL files were retrieved from:

  http://cdn.mysql.com/Downloads/Connector-C/mysql-connector-c-6.1.5-win32.zip

  This gem *includes* vendor/libmysql.dll with redistribution notice in vendor/R
EADME.

================================================================================
======================

Post-install message from rmagick:
Please report any bugs. See https://github.com/gemhome/rmagick/compare/RMagick_2
-13-2...master and https://github.com/rmagick/rmagick/issues/18

C:\Bitnami\redmine-2.6.5-0\apps\redmine\htdocs>
그 다음, rake redmine:plugins:migrate RAILS_ENV=production 을 수행하여 plugin을 등록해 준다.
C:\Bitnami\redmine-2.6.5-0\apps\redmine\htdocs>rake redmine:plugins:migrate RAILS_ENV=production
DL is deprecated, please use Fiddle
rake aborted!
Mysql2::Error: Can't connect to MySQL server on '127.0.0.1' (10061)
이렇게 모든 절차가 완료 되어야 Thin_Redmine서버가 정상적으로 동작하기 시작한다.
정상 동작까지는 약간의 시간이 걸린다 (약 2~3 분 정도 , PHP SQL에 해당 내용이 모두 반영되는데 시간이 걸리는 것으로 보인다.)
https://gemfury.com/help/could-not-verify-ssl-certificate
다음 사이트 가 매우 유용하다.
카테고리는 다음과 같다.
Mailing Solution
Windows and Linux
다음 사이트는 Windows 10에서 Linux 시스템을 구동하는 방법론에 관한 것이다. (MS 제공)
- Windows Subsystem for Linux Documentation
Windows에서 Linux 시스템을 Install 하는 방법론
- Windows 10 Installation Guide
본 문서는 Windwos Apcahe 서버에서 *WebDAV*를 기반으로 하면서 Git Server를 설치 운용하는 방법에 대하여 논한다.
일단, Git For Windows가 설치되어 있다고 가정한 상태에서 설명을 서술한다.
많은 경우, Windows의 Apache 서버 세팅 대신 Linux Apache 서버 세팅인 관계로 Windows에서 어떻게 Git 서버 세팅이 가능한지, 잘 나와 있지 않다. 그러나 생각보다 쉽다.
일단 서버의 경우 다음과 같이 bare Git Repository를 htdocs에 만든다.
이 두 명령어는 Windows Commander로 만들고
mkdir test_git.git
cd test_git.git
git 명령은 Windows용 Git Bash를 사용해야 한다. 디렉토리는 test_git.git 이라 가정한다. (..\htdocs\test_git.git) 이다.
git --bare init
git update-server-info
즉, Command 창과 Git Bash 창을 동시에 사용해야 한다.
다음 WebDav를 활성화 시켜야 한다. 2가지 방법이 있다.
제어판->Windows 기능 활성/비활성 -> IIS (Internet Information Service)기능 활성화
a2enmod dav_fs
그런데 보통은 a2enmod.exe 가 Redmine Apache 서버에 없다 그럼 다른 방법은??
이 방법을 통해 실제로 Git Server를 활성화 시켰다.
일단, Apache 서버를 끄고
/conf/ httpd.conf 에서 다음을 찾아보자.
Dynamic Shared Object (DSO) Support
이 항목에서 다음의 Module 3개가 모두 Load 되도록 한다.
LoadModule dav_module modules/mod_dav.so
LoadModule dav_fs_module modules/mod_dav_fs.so
LoadModule dav_lock_module modules/mod_dav_lock.so
현재 httpd.conf 에
DocumentRoot "C:/Bitnami/redmine-2.4.2-0/apache2/htdocs"
로 설정되어 있고 해당 Root의 형식이 그 밑에 설정되어 있다.
나중에 환경변수로 Git Repository 를 설정하고 비슷하게 만들어서 실험해 보자.
그 다음 Password File을 생성해야 한다. Bin 밑에 보면 htpasswd 가 있다. 이것을 사용하여 다음과 같이 만들자.
$ htpasswd -c passwd.git <user>
그러면 password 를 묻는다. Password를 입력하면 passwd.git 파일이 생성된다.
passwd.git 파일을 /conf 밑에 복사한다.
사용자를 추가하기 위해서는 위에서 passwd.git 에 –c 옵션 없이 사용자를 추가하면 된다.
다시, httpd.conf 파일을 열어서 다음과 같이 편집한다.
# WebDAV for Git Server
# First Locking DAV Operation using DavLockDB
# Second Including the following Directory
#

DavLockDB  "c:\Bitnami\redmine-2.4.2-0\apache2\var\DavLock"

<Location /test_git.git>
     DAV on
     AuthType Basic
     AuthName Git
     AuthUserFile conf/passwd.git
     Require valid-user
  </Location>
DavLockDB 경로를 잘 적어 주어야 한다.
User의 경우 valid-user로 해주어야 한다.
Apache 서버를 다시 Enable 시킨다.
이 정도만 하면
http://jnwhome.iptime.org/test_git.git 하면 해당 페이지를 볼 수 있다 (ID와 PW 입력 후)
그리고 가장 중요한 점은…
Test_git.git 폴더의 권한을 잡아 주어야 한다. Linux에서는 이 부분을 chmod 혹은 chown -R www.www 을 통해 수행하는데 Windows 에서는 전혀 다르다. Windows에서는 test_git.git 에 우측 마우스를 대고 속성->보안으로 들어가서
*Authenticated Users*를 모든 권한으로 해 주어야 한다. 안 그러면 Git 에서 에러가 난다. 이로서 WebDav로 인증된 사용자가 Git Remote 서버를 인증하여 사용할 수 있게 된다.
Client 에서는??
만일 Git Bash가 있다면 다음과 같이 하면 된다. (경로는 Windows 경로가 되도록 한다)
mkdir ~/Desktop/test-project
cd ~/Desktop/test-project
git init
git remote add origin http://<user>@<server name or IP address>/test-project.git
touch README
git add .
git commit -a -m “Initial import”
git push origin master
만일 TortoiseGit 이 설치되어 있다면 다음과 같이 한다.
일단, Git Repository here 를 수행하여 특정 폴더를 git Repository 로 만든다.
Bare로 만들면 안된다.
TortoiseGit -> Setting -> Git 에서 설정을 확인한 후 (사용자 정보와 이메일)
Git->Remote를 설정한다. (매우 중요)
<URL>
http://jnwhome.iptime.org/test_git.git
이것만 넣어 주어도 자동적으로 origin 이 뜬다. 다음이 중요하다.
<Push URL>
http://MyID:MyPW@jnwhome.iptime.org/test_git.git
꼭 ID와 PW를 http:// 앞에 같이 써주어야 한다.
그리고 PUSH를 해주면 Remote에 Push가 된다.
UTF-8로 Coding하여 문제가 사라진다.
Google Adsense를 적용하기 위해 google_ad_client 변수를 _config.yml에 적용하였다.
# Set Google Adsense
google_ad_client: ca-pub-2352406350095521
그리고 Debugging을 위하여 post.html 파일에 다음과 같이 하단 부분에 Debug COde를 삽입하였다.
  <div class="veryfy_google_ad">
    {% if site.google_ad_client == "" %}
        {{"There is no google_ad_client"}}
    {%else%}
        {{"Parameter" }}
        {{ site.google_ad_client }}
    {%endif%}
    {% if site.google_analytics == "" %}
        {{"There is no google_analytics"}}
    {%else%}
        {{ site.google_analytics }}
    {%endif%}

  </div>
그런데 이것이 잘 동작하지 않았다. {% if site.google_analytics "" %} 문은 정상적으로 동작하였으나 위쪽의 {% if site.google_ad_client "" %}은 정상적으로 동작하지 못했다.
간단하였다. jekyll serve를 Stop 시키고 다시 시작하였더니 정상적으로 동작한다.
다시말해, _config.yml 에 변수 적용을 하기 위해서는 Jekyll을 껐다가 다시 켜야 적용이 된다.
Google Search Console 에 로그인하여 등록하는 것이다.
다음과 같이 된다.
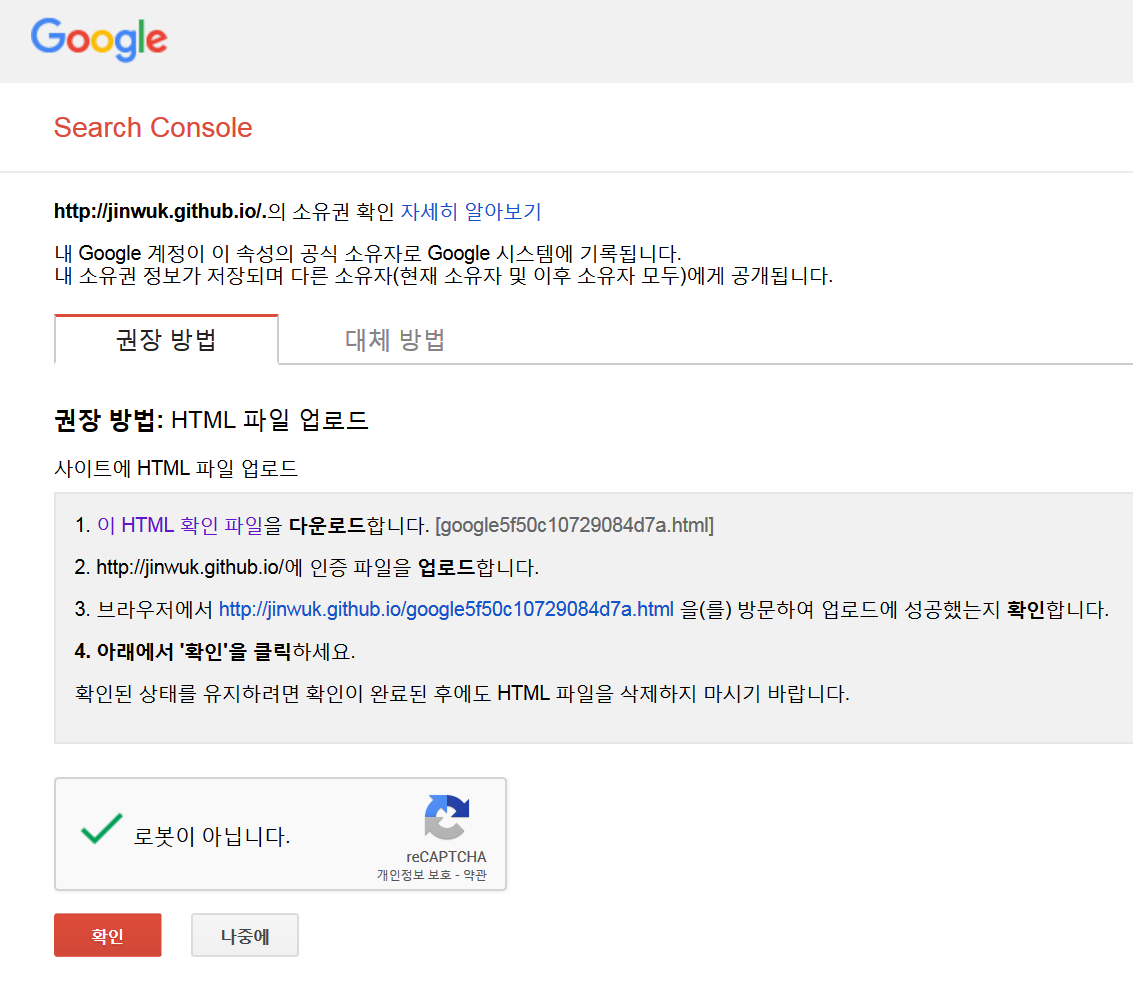
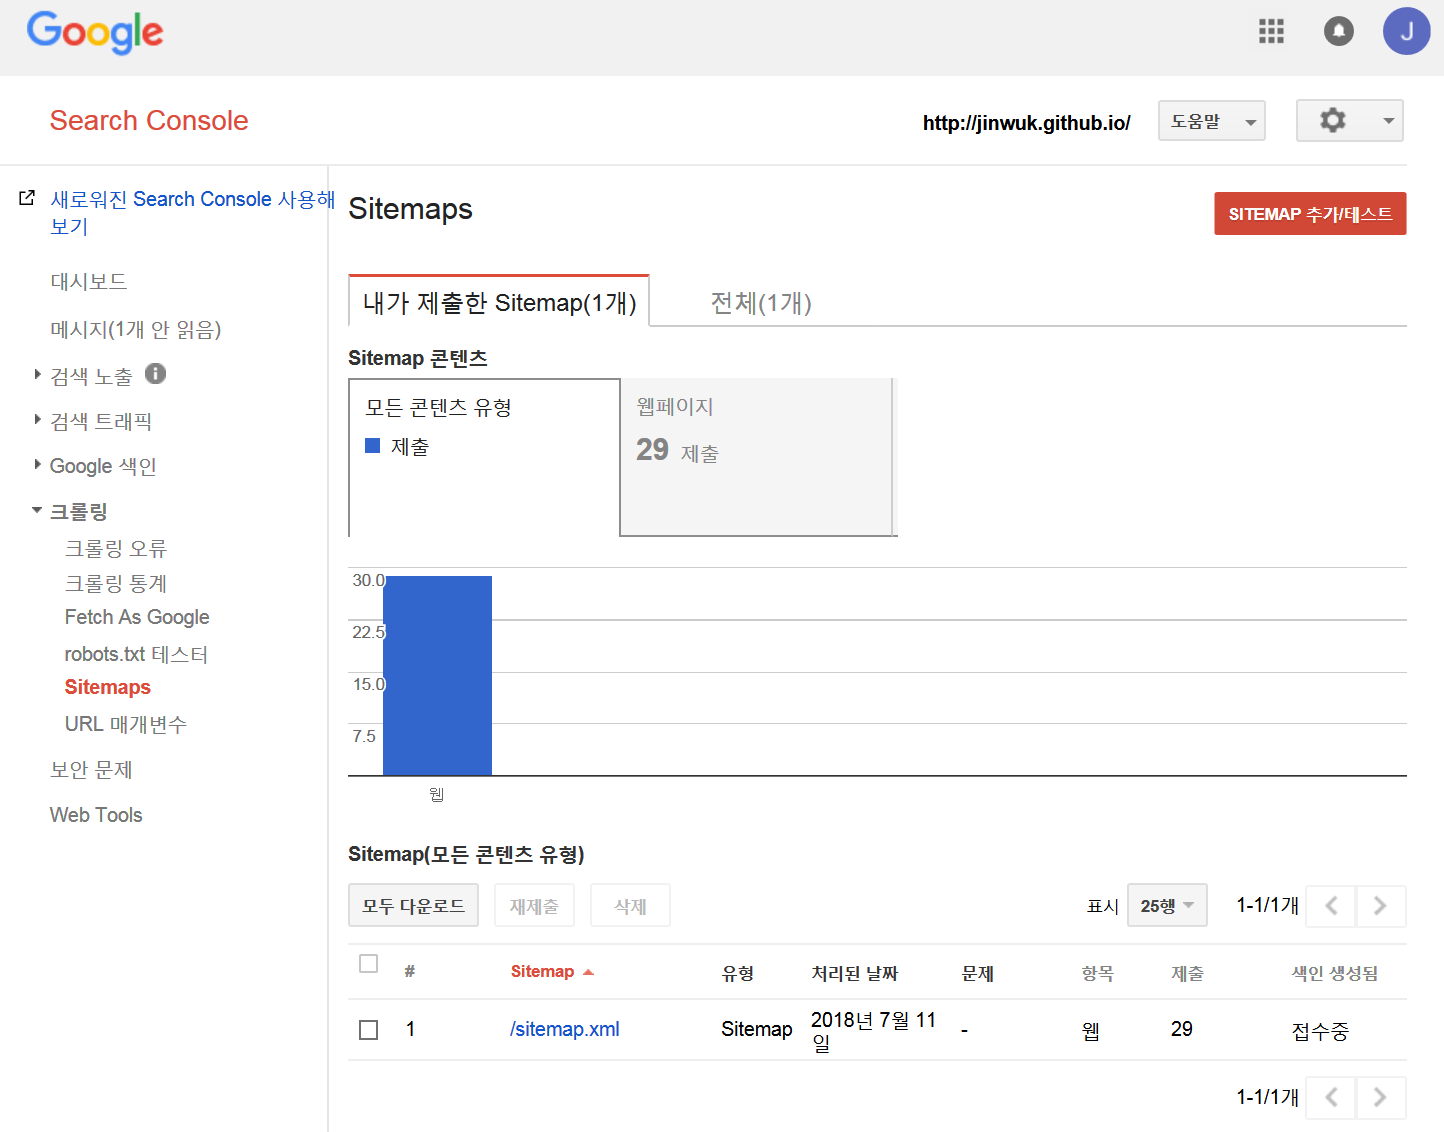
크롤링->Sitemap 을 선택하면(아래 그림 좌측하단) Sitemap 추가/test 탭이 우측 상단에 보인다.
여기에 다음 그림 처럼 Sitemap 사이트를 등록시키면 된다.

그러면 다음과 같이 된다.
다음 페이지를 참조한다.
http://dveamer.github.io/homepage/Sitemap.html
다음 사이트를 참조한다.
https://twpower.github.io/101-create-sitemap-and-feed-in-jekyll
이 사이트에 따라, 설치해 본다.
D:\Document\Github\Jinwuk.github.io> gem install jekyll-sitemap
Fetching: jekyll-sitemap-1.2.0.gem (100%)
Successfully installed jekyll-sitemap-1.2.0
Parsing documentation for jekyll-sitemap-1.2.0
Installing ri documentation for jekyll-sitemap-1.2.0
Done installing documentation for jekyll-sitemap after 0 seconds
1 gem installed
사이트 내용 중 GemFile 에는 다음과 같이 추가한다.
# If you have any plugins, put them here!
group :jekyll_plugins do
  gem "jekyll-feed", "~> 0.6"
  gem "jekyll-sitemap"
end
_config.yml 을 다음과 같이 수정한다.
plugins:
  - jekyll-feed
  - jekyll-gist
  - jekyll-sitemap
Plug-In이 없이 추가할 수 있으나 Jekyll 3.4 버전 이후 부터는 해당 Plug-In을 사용할 수 있으므로 이 방법을 권장한다.
플러그인 없이 Jekyll Sitemap 만들기